The Complete DIY Roof Inspection Checklist
Having a roof over your head is a phrase that we hear quite often as a mark of accomplishment. When you’ve got a roof over your head, it means that you’ve done the hard work it takes to purchase a home. But that hard work can be all for nought if you don’t ensure that the roof over your head is well-kept. Inspecting your roof and following a roof inspection checklist is key to ensuring you keep your roof in tip-top shape.

When and Why Should I Go Through This Roof Inspection Checklist?
If there is an issue with your roof it can quickly lead to significant and expensive issues with your home. Leaks, structural problems, you name it. They can all start with your roof. Catching problems early by following a comprehensive roof inspection checklist can help you solve problems before they start.
You should inspect your roof and follow a roof inspection checklist twice a year and after large storms. For your biannual inspection, pick a good day, preferably after the last big frost of the year in the spring and before the first big freeze in the late fall. For your post-storm inspection, you should get onto your roof as soon as it is safe to do so: during the day, when there is no rain, thunder, or wind at all. Having this roof inspection checklist in hand highlights important things to keep in mind as you go.
How To Do A Roof Inspection
Begin along one side of a roof area and proceed left to right, not up and down, inspecting as you go. Going left to right keeps your balance pitched in one direction longer – going up and down the roof means you’re turning more frequently with your balance facing toward the ground, increasing your risk of falling. Have the roof inspection checklist below handy as you move along your roof.
The Roof Inspection Checklist
Divots and bumps in shingle lines
Your roof is built to be as square and level as possible. If during your inspection you come across divots, bumps or a deviation in lines of shingles, you may have a problem.Use caution as you move over and around these areas during your inspection as they can be evidence of a failing roof. Divots could be any number of things, from a compromised roofing material to a misplaced beam.
If you find bumps in your roof in a certain area, you may have something as simple as an extra set of shingles or something as complicated as a board buckling and springing upward. You can easily peel back some of the shingles to see what the issue is.
Deviations in shingle lines can be the result of a roof that has shifted, either because of structural issues or weather. Determining which can be done by inspecting the underside of your roof – if there is water damage on the wood underneath, it’s a good bet that weather is causing some deviation.

Cracked or missing shingles
Cracked shingles can lead to further damage to your roof down the road, so replacing them is key. Even if damage is slight, replacing shingles now is better than waiting until there is a problem. If a shingle or shingles are entirely missing you’ll want to replace them as soon as possible.

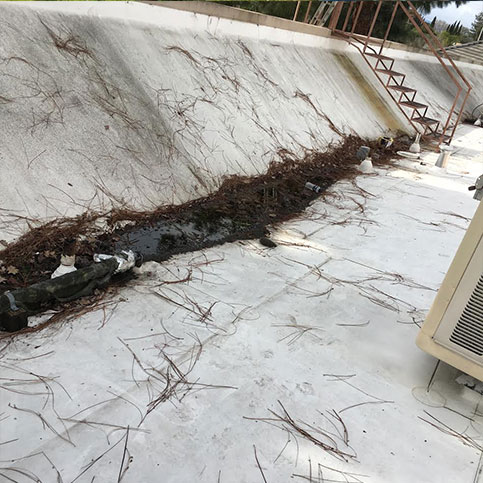
Obvious debris
You’ll want to remove any branches, sticks, leaves, balls, dolls, or other things from your roof as soon as you come across them. Additional, unnecessary weight on the roof can cause damage and debris can hold moisture and insects that can greatly affect the quality of your roof.
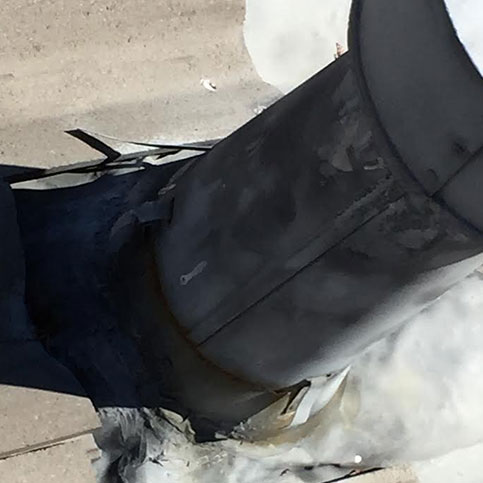
Worn footings and damaged vents
This is one of the most important items on the roof inspection checklist. Your bathrooms and kitchen likely vent gases out of an exhaust pipe which exits through your roof. Additionally, whether you have a chimney or not, your furnace has an exhaust pipe that likely exits through the top of your roof as well. You’ll want to inspect the rubber footings around the area where these exhaust vents meet the roof. This area is particularly prone to weather damage, and failure to fix it could expose your flashing to further damage.

Worn or rusting flashing
Another critically important item on the roof inspection checklist is your flashing. Flashing is generally sheet metal but can be any waterproof substance. It is used around exhaust vents and pipes (underneath the rubber footing) and near the edges of your roof to protect areas that are prone to water seepage. If the flashing is rusted or damaged, you’ll want to replace it as soon as possible. Damaged flashing is one of the key causes of a failing roof.
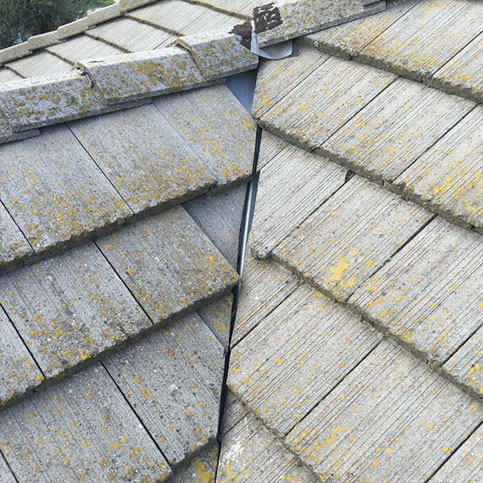
Live plants, algae, or moss
Unless you have a very specific type of home that has moss as part of its roof, you don’t want any plants up there. Roots and tendrils from plants can damage your roof, as can the extra moisture they tend to hold. If you see black staining on your roof, this is cosmetic – you can powerwash it off yourself or a professional can quickly and easily remove it. However, if something is actually growing into or onto your roof, fixing it should be a high priority.
Damaged eaves
Eaves refer to many areas of your roof, but the most important are at the very top. On many roofs, eaves, or small vented overhangs, are built into the spine of the roof to allow for heat exchange. Ensure that these are in good shape. A damaged eave vent can cause unexpected heat buildup in your attic and home during the summer months.

I Need to Inspect My Roof But It’s A Different Material.
You can still inspect it and follow our roof inspection checklist! Metal roofs are becoming more popular and allow homeowners to walk on them. You’ll want to be sure it’s not wet and not too hot of a day however. Many homes in California have tile or clay roofs – these can be inspected, but you should use caution moving across them. They are often best inspected using this roof inspection checklist from the ground. It is easy to see cracked or damaged tiles, rusting, damaged eaves or debris on this type of roof.
Ladder Safety
If you do plan to set foot on your roof, be sure to keep these ladder safety tips in mind:
- Always use a ladder with another person present.
- Always have two feet and two hands on the ladder at all times.
- Always use the ladder in favorable weather, with no wind.
- Always wear closed-toed shoes.
- Always climb a ladder with another person present.
- Never reach from a ladder.
- Never climb a crooked ladder or one not firmly placed on the ground.
- Never climb a ladder higher than the recommended rung.
Ensure your ladder is firmly placed and you can easily get onto the roof without reaching extensively with either your arms or legs. As your helper to hold the bottom of the ladder as you climb. Take note of any gutters or trim hanging from your home and roof – do not grab onto these areas.
A general rule of thumb is that you should have at least three rungs of the ladder above the crest of the roof for your to safely get onto it.

Now It’s Your Turn
Inspecting your roof using a comprehensive roof inspection checklist at least twice a year can help catch problems before they start. WIth a bit of effort, you can keep that roof over your head in tip-top shape!